


Hey All!
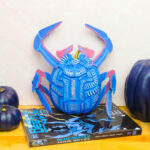
I’m sure you all know by know I’m a huge Star Wars fan and I’m counting down the days until Star Wars The Rise of Skywalker to come out. Every Halloween I do some elaborate pumpkins and as soon as I saw the D-O Droid announced at Star Wars Celebration, I knew I wanted to turn him into a Pumpkin for Halloween. Well folks I did it and I think it came out awesome! It was a bit of work, but it was honestly easier than I thought it would be to make.

(Photo by Daniel Boczarski/Getty Images for Disney )
I got a few images from Disney for reference and did my own little pumpkin inspired by him. It’s not exact but it’s pretty close for a pumpkin.

Since I wanted to take some really cool photos to show my hard, I decided to take the pumpkin to Galaxy’s Edge. The security people were kind enough to let me in with it.

I’m so glad they did as I was beyond the point of happy to take these pics with my pumpkin D-O around Batuu.

He was a big hit at Batuu and he’ll surely be a big hit at your home or Halloween parties if you decide to make him too!
Here is what you’ll need and how to make it!


- Round White or Beige Pumpkin
- White Paint
- Silver Paint
- Paint Brush
- Black, Green, and Silver Stick-on Vinyl
- Black Thick Craft Foam
- Small and Large Wooden Skewers
- Styrofoam Cone
- Cardboard Tube
- Black Marker
- Clear Magic Tape
- Hot Glue Sticks and Gun


First you paint your pumpkin white, except for the stem. You paint the stem silver.

Add some silver brush strokes of paint around the pumpkin as well to give him that used roughed up droid look. Let all the paint dry over night.

Wrap you cardboard tube with silver stick-on vinyl. Paint your large wooden dowel silver.

Cut about 3 inch and 6 inch rectangle pieces of black thick craft foam. Glue the 3 inch pieces together in a stack of four to make the neck. Glue the 6 inch pieces in a stack of 4 and then wrap them in silver stick-on vinyl and tape.

Paint the small wooden dowels with your black marker and let them dry.

Cut a few inches off your styrofoam cone and wrap it in white stick-on vinyl. Cut out three oval like shapes from the black vinyl and stick it on the top of the cone. Stick on green stick-on vinyl to the tip of the cone. Stick the small wooden dowels into the back of the head. Hot Glue the head to the stack of 3 inch craft foam you made for the neck.

Hot Glue the head onto the silver base you made and then glue the base to the two silver rods you made with the large wooden dowel and cardboard tube. Cut the dowel and tube down to a size that the bottom reaches the middle of your pumpkin. Glue the dowel the entire piece onto your pumpkin. Cut one 2.5 inch piece of black thick craft foam to hold it all up and stick it under the silver base.

Lastly you cut out strips of black vinyl and line the front and center of the pumpkin with it to make the wheel.

You also place two triangle green shapes on the front of the wheel.

Lastly you take your black marker and draw some lines down the center of the two strips of black vinyl to make the tracks of the wheel.

That’s it! You’re done! He doesn’t have to be perfect! This is a fun DIY and Craft! It just has to be cute and make you happy!

Boy does this little droid make me happy! We had a blast in Batuu!

We hung out with the droids at the droid depot.

We saw the land speeders!

He tried to open some doors because droids love opening those doors don’t they!

We hid from some storm troopers!

And we went and got some Ronto Wraps and said hi to Chewbacca!

He’s probably one of my most favorite pumpkins that I’ve ever made!

I hope you love him just as much as I do! You can find more fun Halloween Pumpkin ideas HERE!
Don’t forget, countdown to Star Wars The Rise of Skywalker has begun! I can’t wait to see it can you?
Also, you may or may not see him on the Disney Family site! Yep they may be featuring this tutorial on their site as well. Just in case you’re wondering if you see it there!
Notes:
All cutting and gluing should be done by an adult.
![]()


Comments